A Comparison of Sponge Baby Bottle Brush and Nylon Brush

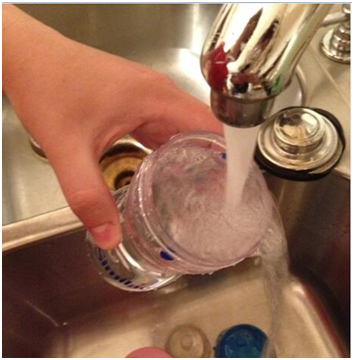
[Introduction] If you are a parent who has a bottle-feeding baby currently, you are supposed to prepare at least one baby bottle brush for thoroughly bottle washing. And if you browse Amaozn.com to find a proper brush for baby bottle, you will find a wide variety of bottle brushes is available. In fact, there are so many types of brushes for bottle, including sponge brushes and nylon brushes. Then which type of brushes will be the most suitable one for you? Sponge or nylon? Below is a comparison of both brushes to help you make a choice. You can read this article to find an answer.

Nylon and sponge - which baby bottle brush is proper for your situation

What makes the difference between nylon brush and sponge brush? Is there a pointer used to decide which bottle brush is better? Well, this should be determined according to the material of the baby bottle. Bottles of different materials need different types of brush to be cleaned.

So what kind of baby bottle need a nylon bottle brush? What about a sponge bottle brush?

In general, nylon bottle brushes are more fitted for glass baby bottles while sponge bottle brushes are better for plastic bottles. Since the nylon brush is easies to damage the inside of a plastic bottle as well as deposit dirt, you better not use a nylon baby bottle brush to clean a plastic bottle.

Now let me introduce these two brushes in details one by one.

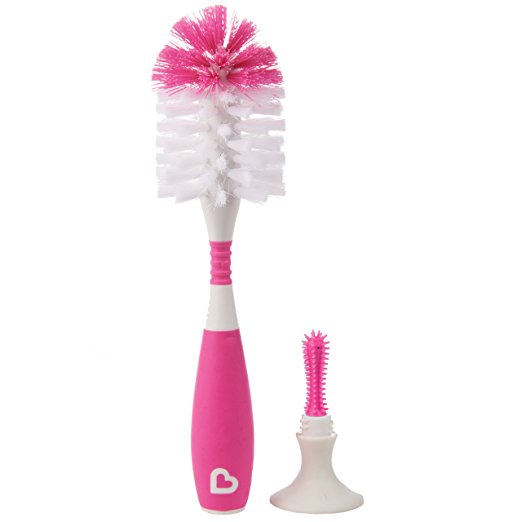
1. Nylon bottle brush

Made of nylon, polypropylene and stainless steel, this type of bottle brush is mainly used for brushing the inside of the baby bottle.

Main features:

<!--[if !supportLists]-->l  <!--[endif]-->It can closely adhere to the bottle wall and has strong cleaning effect.

<!--[if !supportLists]-->l  <!--[endif]-->The brush head with high density bristles can completely remove stubborn stains.

<!--[if !supportLists]-->l  <!--[endif]-->The handle of this baby bottle brush is mainly plastic coated to prevent scratches on the bottle.

<!--[if !supportLists]-->l  <!--[endif]-->Pacifier brush with nylon bristle is more convenient for pacifier and nipple cleaning.

<!--[if !supportLists]-->l  <!--[endif]-->Nylon bottle brush is a prefect match for glass baby bottles.

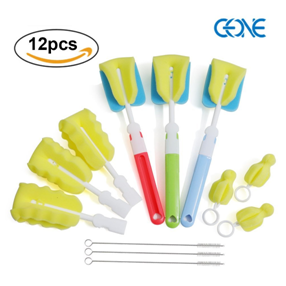
2. Sponge bottle brush

Sponge and polypropylene are the main materials of this type of brush. The sponge brush also has good performance in cleaning the baby bottle

Main features:

<!--[if !supportLists]-->l  <!--[endif]-->Elastic and flexible shape design to completely remove stubborn dirt.

<!--[if !supportLists]-->l  <!--[endif]-->The well-shape brush head is capable to clean the hard-to-reach place easily.

<!--[if !supportLists]-->l  <!--[endif]-->The easy-to-grip handles help you handle the brush without effort.

<!--[if !supportLists]-->l  <!--[endif]-->Sponge brush is magic cleaning tool for plastic bottles.

In Short, both nylon and sponge brush would be useful if you utilize in right way. There is no standard to judge which material is better. You just need to choose the best suitable bottle brush in accordance with to your need and your baby bottles. Below are some amazing brush for you.

Top 5 Amazon Baby Bottle Brushes Recommendation

NO.1. cFone Premium 4 in 1 Baby Bottle Brush Kit

NO.2. Munchkin Bristle Bottle Brush, Pink

NO.3. Dr. Brown's Bottle Brush, Blue

NO.4. OXO Tot Bottle Brush with Nipple Cleaner, Green

NO.5. StarPack Premium Bottle Brush Set of 4

Explore more from here.

 
May 18th, 2018   |   Permalink   |  

Best 5 Bath Sponge for You to Have a Comfortable Shower

A comfortable shower can bring you a fresh morning or a sound sleep at night. Guess how many things you would need to have a comfortable bath? Shower gel, shampoo and bath sponge are absolutely needed.

For shower gel and shampoo, you may have your favorite ones on your bathroom. So I am going to talk about the third essential thing - shower sponge in this post. Below I will post 5 kinds of loofah sponge. Maybe you will find the most suitable one after reading1. cFone's Exfoliating Bath Sponge with A Massage Comb.

This bath scrubber have fine and porous texture, which is capable to give you a comfortable friction. It is made of high quality material so that it won’t be easily to mildew. Its net structure help you to create lots of foams after your add shower gel to it and gently rub it. The bath sponge features on a massage comb attached. You can invigorate your scalp by combing during shower.

2. Natural Sea Grass Sponge 5"-5.5"

Sea Sponge is a natural and precious way for bath. Its unique softness and natural hypoallergenic antiseptic properties is suitable for most people, even for who has sensitive skin. Sea sponge is soft and it is capable of absorbing a lot of water. With this bath sponge, you can lean your skin without worry about skin damage.

3. Madholly 4 Packs Exfoliating Loofah Sponge Pads

This body scrubber is made of natural loofah and terry cloth material. 3.9*5.9 inches of the size fits most of people. The items have a nice shape and size with a comfortable band and fabric backing designed to ensure the loofah pad stays in your hand.

4. Easymoo Bath Sponge Shower Pouf

The great thing of the scrubber is that the material of this sponge contains carbonized bamboo, which makes this scrubber environment-friendly. The bamboo charcoal can effectively remove dirt and wash away excess oil. You can simply stimulate cellular vitality with this product.

5. Natural Exfoliating Loofah 4 inches

It is a completely green and natural scrubber! There is 4 inches long of this loofah. you can cut it into 4 smaller pieces and use one at a time. Although this dehydrated luffa might be a little rough for skin, it is still a nice bath sponge with no doubt.

 
January 24th, 2018   |   Permalink   |  

How to Get Rid of Smelly Dish Scrubber

There was something getting stinky in my kitchen. I checked my fridge, meet, eggs and sink, but none of them are the reason to the smelly odor. After searching, I found out that my dish scrubber was giving off funky odor! What is more horrible? The scrubber had a great deal of mildew on it! What happened to this scrubber? I just bought it a few days ago! Is there anythig wrong with the dish scrubber?

I asked this question to my Mom and receive a severe telling off for not treating the kitchen scrubber in a right way. She told me that the sanitation of sponge should be paid attention because this porous thing is easy to become a germ breeding place. Also, she told me that the dish scrubber should be cleansed and sterilized regularly. For storage, I should put the scrubber sponge in an air and dry place after cleaning and sterilizing. Of course, the sponge need to stay dry when I not use it.

However, those solution is not sufficient to reduce bacterial growth and prevent the sponge from being smelly, my Mom said. She advised me to try other scrubbers like silicone sponge which is not porous at all. She said such a sponge will dry faster then regular sponge so that I won't get a stinky sponge in kitchen due to forgetting air dry them after every time I use.

Therefore, I brought a silicone scrubber and have a test on this scrubber. It is really easy to dry! I just needed to rinse it after washing and then hang it on a hook. There is nothing else I need to do!

Since the silicone sponge won't absorb water, the chance of bacterial growth on the sponge is less that cellulose sponge or natural sponge. In other word, this kind of dish scrubber won't be mouldy and smelly fast.

It is a ideal kitchen scrubber for me. I only need to wash some plates and pots after dinner. So I want a scrubber which can simply wipe off the residue from the dishes. What's more? This sponge is heat resistant so that it can be a coaster for me to avoid burn mark on my table.


If you are worry about your dish scrubber drying slowly and mildewing easily, you can utilize a silicone scrubber as an alternative.  

 
January 24th, 2018   |   Permalink   |  

How to Knit a Fun Kitchen Scrubber for Dish Cleaning

You may have heard about some people crotcheting loofah sponge or coaster by themselves before. Those crotchet things are not only unique but also convenient to use. Besides, there are other amazing handmade stuffs that you may like to have. For example, you can use a knitted kitchen scrubber to do dish washing. By making your own kitchen gadget, you can have more fun during doing household chore.

In today's post, I would like to share you a tutorial about how to knit a scrubber according to your own preference. The knitting process is not difficult, you are definitely able to knit a kitchen scrubber after reading. Below is the detailed tutorial.

1. Preparation

Step 1. You need to prepare some yarn, tulle, a crap of cardboard, a ruler with cutting mat, Size 9 knitting needles and scissors. You can choose your favorite color of yarn and tulle. Here I will show you how to make a 3 1/2-inches x 5-inches kitchen scrubber.

Step 2. Before start to knit, you need to process the tulle as below.

Firstly, lengthwise fold the tulle in half twice.
Secondly, place the folded tulle on a flat surface and then cut it out from the short side of the tulle with scissors and ruler. PS: you need to cut strip of the tulle approx. 1 1/4 inch wide and prepare 4 strips for 1 kitchen scrubber.

Thirdly, form a long "tulle string" by knotting the 4 strips.

Lastly, wind the tulle onto cardboard to avoid being tangled.

2. Knit Your Own Kitchen Scrubber

Step 1. Loosely cast on 15 sts holding both the cotton yarn and the tulle together.

Step 2. Continue knitting the scrubber in garter stitch.

Step 3. Bind off loosely, knot excess thread, and cut the extra if this kitchen gadget reaches 5-inches or desired length.

Step 4. Make a loop for hanging.


After that, you will have your fun and unique dish brush cleaner. Every time you see or use it in your kitchen, you will feel satisfaction with no doubt. By the way, if you want to try some new kitchen scrubber which is antibacterial, you can try to use silicone sponge.

 
January 17th, 2018   |   Permalink   |  

Away from Bacterial - Wash Baby Bottle Effectively

It is important to clean you baby bottle. That will reduce the risk for food poisoning and avoid contact with germs during bottle feeding. If you make sure that your baby is safe while feeding, you should clean thoroughly frequently. Moreover, it is significant to properly wash your baby bottle. Here are something for reference.

Rinse the bottle as soon as your babe is finished. This will prevent bacteria from the milk and your baby’s mouth from multiplying.

Fill your sink with warm, soapy water. Let your bottles, nipples, caps and rings soak. Use a baby bottle brush to get deep inside the bottle. There are also special brushes for cleaning the nipples, caps and other parts. We recommend scrubbing each part for about 10-15 second — make sure you get every crack and crevice!

Gather the Basic Cleaning Supplies

Prepare basics such as hot water, a good baby bottle brush for the bottles and nipples and dish washing liquid. A good bottle brush helps you to clean the sides and bottom of the bottle. You can also use a gentle pacifier brush to clean the rubber nipple which can easily accumulate bacteria. The dish washing liquid should be a non toxic and gentle liquid that is specifically designed for baby bottles and does not leave any residue.

Wash the Baby Bottle Right After Use

Water, sugar and warmth provide the ideal conditions for germs to thrive. Therefore, it is advisable to wash the baby bottle right after use in order to prevent caking of the milk and the creation of a foul odor which is very difficult to get rid of, especially if you are using plastic bottles. Start off by pouring the leftover milk and rinse the bottles with hot water. Brush the baby bottle in and out using a gentle baby bottle brush in order to avoid scraping off the plastic. Move the baby bottle brush along the edges in order to remove the filmy milk residue.

Allow the Baby Bottles to Dry Thoroughly

Rinse all the bottle parts in hot running water to remove the soapy residue and bubbles. Place all the parts on a drying rack and make sure they are left to drain and dry thoroughly in a well ventilated location. Bottles can grow fungus and mold if they remain damp for too long.


Note: Proper sanitation of baby feeding accessories is the best way to ensure that bottle feeding is as safe and germ free as breastfeeding.

 
December 26th, 2017   |   Permalink   |  

Natural Luffa or Bath Sponge? What Should I Choose for Shower?

There are various kinds of bath scrubber such as natural luffa, bath sponge and washcloth. Different people will has different choice preference. For me, I would like to choose bath sponge instead of natural luffa. And today I would like to post the reason in this articles. Maybe you can find out some useful info in my post.

What is a Luffa?

A luffa is a fibrous plant seed pod. The luffa plant is a cucurbit, a group of plants including gourds, pumpkins, and cucumbers. It grows as a flowering annual vine. The pollinated flowers grow cylindrical green fruits that eventually develop into a seed pod filled with many intertwined cellulose fibers. The outer skin is removed to reveal the "loofah" inside.

What is Bath Sponge?     

In general, bath sponge are made of PE material or other artificial fiber. The size of bath sponge is perfectly designed. This environmental and ergonomic design enable you to hold well and wash safely.

Why I Prefer Bath Sponge?

Although both products can exfoliate loose cells from your skin and make you squeaky clean. They produce lather better than anything out there. However, natural luffa is growth germ quicker than bath sponge.

It’s really about the bacteria from mold and mildew that, over time, can collect on our bath tools. It’s this bacteria that can cause skin irritation, infection, and breakouts; particularly for those who suffer from acne, eczema, and sensitive skin. 


Reputable manufacturers will suggest that you replace your natural luffa every 3-4 weeks. A little bit frequent, right? If you are feed up with luffa, you can try my recommendation - bath sponge, which need to be replaced after 3 months use.

 
December 26th, 2017   |   Permalink   |  

How to Wash Dishes with or without Dishwasher

Dishwasher is a brilliant and convenient tool for every family. It saves out time in dish washing. However, sometimes we still need to clean dish by hand. In that case, it will be more effective if you use some handy tools like luffa, silicone sponges and other dish scrubbers.

In this post, I would like share some tips about how to wash dishes with or without dishwasher. Hope you like it.

Part 1. How to do cleansing with dishwasher

If you use dishwasher, then you have no need of dish scrubber like silicone sponges. You just need to set up your machine correctly. Here are some tips for reference. 

Tip 1. Load the Dishwasher Right

Scraping large food pieces off dishes before placing them in the dishwasher allows the unit to do a better job of cleaning. It's also most efficient to load the dishwasher completely full without overcrowding it. Placing dishes on top of each other prevents the unit from cleaning as thoroughly as it should. You also want to make sure to angle bowls, plates, and cups so that the dirtiest side of each is exposed to the water spray. Large items like trays and pans should go in the back. Be certain not to overload the silverware holder either.

Tip 2. Water Temperature and Cycle Settings

Since hot water cleans dishes better than cold water does, set the temperature between 120 and 125 degrees before starting a new load. You can test the water temperature by running water from the sink for approximately 10 seconds. Running your dishwasher at night after the lights and heat or air conditioning turns off allows it to consume less energy.


Note: Be sure to choose the correct cycle based on what you are washing and how stained it is. Normal or heavy cycles work for most loads, although you may occasionally need to use delicate for fragile items. When the dishwasher has completed the wash cycle, select the air-dry option over the heat-dry option to save electricity.

Part 2. How to do cleansing without dishwasher

For hand washing, you can use some tips to make this job easy and effective. Tools like drying rack, drying mat and silicone sponge.

If you just has one sink, you’ll need to make sure that you don’t let dishes pile up too high, otherwise washing dishes will be quite difficult. However, if this is the case, you can use a large drying rack and a bucket to utilize as a makeshift second sink. It may also be helpful to have a drying mat, which is very inexpensive and takes up virtually no room in your cabinet.

Tip 1. Begin by setting up your drying rack, mat and dish scrubber appropriately, and filling your sink up about a quarter- to half-way up with hot soapy water. Place all your dishes on one side of the sink, and the other will be where the clean dishes go: You don’t want to mix these up.

Tip 2. Start with the cups

They are the bulkiest, and usually contain the least amount of bacteria. Dunk each in the soapy water, wash with dish brush cleaner and set in the drying rack. Do about 5 at a time, and then rinse all of them at once. This will speed up the process, and the faucet won’t always be running. If you are using one, place all the cups on the drying mat once they are rinsed. After you are finished with the cups, you’ll still have the entire rack to work with.

Tip 3. Plates and bowls
These carry a decent amount of bacteria, which is why you want to wash them after the cups (so you aren’t spreading bacteria). Wash as many as you can before rinsing them, but your rack will soon fill up. Then, rinse with low-pressure water as you go, and try to keep the temperature as high as possible. End by cleaning all the utensils with silicone sponge, and you’re finished!


December 26th, 2017   |   Permalink   |  

How to Use A Loofah Sponge for Better Shower Experience

Morning shower is a great way to start a day. For having a better shower, I have already prepared my favorite shower gel and shower pouf to get rich foams. Both two things are essential during my shower time. By the way, if you want to indulge in a rich lather, you can't miss a better loofah sponge. Such a bath pouf will give you n invigorating body wash.

Why do I choose a loofah instead of washcloth? As a matter of fact, the method that you use to cleanse your skin is really down to personal preference, but there are definite pros and cons for each. In this post, I would like to focus on body loofah only. Here I will talk about some advantages and disadvantages of loofah. Hope you get to know more about this shower tool after reading.


Part 1. What are the advantages and disadvantages of loofah sponge?

1. Advantages:

Loofahs can provide excellent exfoliation, particularly when skin is especially dry and flaky in the winter months.

Loofahs can also help enhance circulation and encourage pores to expel oil and other impurities.

2. Disadvantages:

Loofahs may harbor mold, germs and bacteria if you don't rinse and store it correctly. 


Part 2. How to use, rinse and store a loofah sponge

While showering, please reserve your loofah for the body only and use gentle circular motions while cleansing to avoid over-exfoliating. You need to wet your loofah and apply a quarter sized dollop of your shower gel. And then work into the bath loofah pouf with your hands until it starts to lather. Your pouf will continue to work into frothy lather while you use it to gently exfoliate your arms, legs, shoulders, etc.

After shower, you need to rinse it thoroughly and pop it into the washing machine every couple weeks to make sure it’s squeaky clean. Then simply let it air dry on a towel or in the tub. To ensure that it dries out properly, store your loofah sponge in a cool, dry place where there is little moisture. You will need to replace your loofah every three to four weeks.

 
December 13th, 2017   |   Permalink   |  

Take Care of Your Kitchen with Multipurpose Silicone Sponges

It is depressing to see a cluttered kitchen with an overflowing sink of dirty dishes. I feel upset if my kitchen is out of control. So I will put everything in my kitchen in order. I have some tips to make my kitchen sparkling. Today I would like to share them with you. Hope you like it.

Tip 1. Get all your cleaning equipment together

The first thing to make a hygienic and welcoming kitchen is to manage all your cleaning tools. You

need to place the cleaning equipment in the right position and keep those items in order, including silicone sponges, general kitchen cleaner, some cleaning clothes, scrubbers and paper towels, oven cleaner, rubber gloves, dustpan and brush, mop and bucket, floor cleaner and a vacuum cleaner.

Tip 2. Choose multipurpose dish scrubber for cleansing

There are various scrubbers for your to washing dishes. Some of them come in the fun shape. Some of them provide an eco-friendly method of kitchen cleaning. And some of them are made of material which make them super absorbent and quick-drying. Also, there are some scrubbers allowing for multi-purpose use. For example, some multipurpose food-grade antibacterial silicone sponges. This kind of dish brush cleaner is better for the environment as well. It don't need frequent replacement. So you can stop buying a new dish sponge every week! The non-porous silicone sponges dry faster and won't harbor bacteria. If you want to get rid of strange smell kitchen scrub brush, you can try silicone sponge scrubber.

Tip 3. Use dishwasher

If you have a dishwasher, you can put those items that can be safely washed in the appliance and start it up. Please remember to leave any heavily soiled dishes to be washed by hand.

Tip 4. Clear and wipe your counter tops

During the dishes soak, you need to spare some time to clean the desktop. Besides, please return items to the cupboards, fridge and pantry and throw any rubbish away. That will help you improve hygiene in your kitchen. PS: silicone sponges can't be used to clear counter tops or oven, so use a rag instead. 

 
December 13th, 2017   |   Permalink   |  

How to Clean and Sterilize Baby Bottle

If you are bottle feeding your baby, then you should make sure that the baby bottle get thorough clean. Most Mom and Dad will use baby bottle brush to wash their baby's bottle. Furthermore, the bottle should be sterilized at a regular interval. Washing and Sterilizing are 2 important things to keep infants and children away from germs. Babies are so vulnerable to infections that parents need learn the correct way to clean and sterilize baby bottle. Here I would like to show some tips in bottle cleaning and sterilizing. Use them to keep your baby safe and protected.


Part 1. How to Wash Every Part of Baby Bottle with Baby Bottle Cleaner

Step 1. Disassemble the Baby Bottle

A baby bottle is consist of different parts, you need to taken out of the bottle and take them apart for washing. Please remember to have all bottles and sippy cups completely disassembled in every wash.

Step 2. Soak with Hot Soapy Water

Before using baby bottle brush for clean, you need to rinse the bottles, cups and attachments at first. Then please fill the sink with hot water and put in a drop or two of mild dish detergent. After that, soak every part in the hot soapy water for a while.

Step 3. Clean with a Baby Bottle Brush

For a thorough cleaning, you need to pick out a useful cleaning brush set to handle all parts of baby bottle. Try to get inside the bottle, and thoroughly wash all the nicks and corners of the bottle, cup, and pacifier by using the baby bottle brush. Give special attention to the collars and nooks and crannies, as they are a favorite breeding place for bacteria, mold, and mildew.

Step 4. Rinse Everything with Hot, Clean water After Washing

After thoroughly cleaning, place the bottle on a dish rack or clean kitchen towel upside down for drying. Once bottles, caps, rings, and nipples are completely dried, you can store them in zippered plastic bags to protect them from any dirt or dust.


Part 2. How to Sterilize the bottle

There are many ways to sterilize the feeding bottle and each one has its pros and cons. Below I will post the most common 2. 

Method 1. Boiling

This is the conventional method of sterilization. You just need to put all part of the bottle in a large pan of water and boiling them for 10 minutes. Make sure to submerge all the bottle completely underwater as the level of water reduces during boiling. PS: this method of sterilization damages them faster compared to other sterilizing methods. Hence please remember to check the teats regularly.

Method 2. Microwaving

This is one of the most popular methods of sterilizing the bottle. It is quick, convenient and hassle-free. Only need to take the bottle in a microwave to sterilize for 90 seconds. PS: Please remember to leave the bottle open to avoid pressure buildup inside the bottle when using this method.


December 13th, 2017   |   Permalink   |  

kaku kou publishes new website

Welcome to kaku kou's official website. Here you will find all things from the world of kaku kou.
 
December 11th, 2017   |   Permalink   |